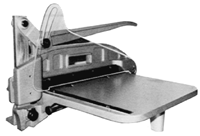
The shear has a base or “bed” (1) which forms the work area. At the top of the bed there is a graduated scale (2) which is also the material stop. The scale is held in place by two machine screws and provides the means for adjusting the squareness of the cut.
The lower blade (3) is located in a recess along the right edge of the bed and is held in place by four 1/4 - 20 flat head machine screws (14). The oversize holes in the bed allow for adjusting the position of the lower blade relative to the upper one. Immediately behind the blade are two eccentric washers assemblies (4) which are used to secure the position of the blade during the adjusting process.
Three legs support the shear, one on the left side and one each at the upper and lower right corners. The leg on the left is for support. The other two also provide mounting points for the movable upper blade assembly.
On the right side of the shear (from the operator’s perspective) there is a pivoting assembly referred to as the “bridge” (5) that opens and closes when the handle is moved up and down. The upper blade (6) is fastened to the bridge by four 1/4 - 20 hex head cap screws (13). As the handle is moved up and down, the end nearest the operator pivots on a vertical steel bar (7) that is attached to the leg by a bolt (16). The bar is slotted to allow adjustment of the shearing angle.
The end of the bridge furthest from the operator slides up and down on another vertical steel bar (8) which is attached to the front leg by a bolt and nut (15). The shear opens as the handle is raised, and closes as it is lowered. When opening and closing the shear, note that the steel bar at the pivoting end remains stationary, while the on at the sliding end moves back and forth slightly.
During the shearing operation, it is imperative that the bridge assembly is rigid and moves up and down without any side-to-side movement. At both the pivoting and sliding ends, there are offsets in the casting that house either bronze or Derlin® pads called “gibs” (9) that are used to eliminate play. The gibs ride on the steel bars and are tensioned by adjusting the two set screws (10) located in each of the offsets.
The bridge also provides mounting for the plastic guard (not shown). One end of the guard is fastened to the handle with a machine screw (11) and the other mounts on the rear pivot pin (12) with a snap ring. Shears exert a considerable amount of pressure and have extremely sharp blades. To minimize the possibility of injury, it is imperative that the guard is functional and in place at all times the shear is in use.
Adjustment and Set-Up
Setting up a shear is not complex, but needs to be done accurately and in the correct sequence. The following step-by-step procedure should make it easy to achieve perfect results.
Step 1:
BLADE REMOVAL
Before removing the blades, it is helpful to remove the guard. If you are merely making a blade change, it is only necessary to remove the screw where the guard is attached to the handle and swing it out of the way. If you are going through the complete adjustment process, it will be necessary to take the guard off by removing the snap ring from the pivot pin.
Removal of the upper blade is done by removing the four cap screws and nuts. Open the shear and, using two 7/16” wrenches, loosen and remove the nuts while leaving the screws and place. This will help keep the blade in place until you are ready to lift it off.
The lower blade is held in place with four flat head machine screws and nuts which are removed using a screwdriver and a 7/16” wrench. Since one end of the blade protrudes under the scale, use care when lifting it out to avoid bending the scale. After removing the blade, loosen the screws holding the eccentric washers using a 1/8” hex key.
Remember to exercise extreme care when removing or installing a plastic cutting upper blade. They have a knife-edge and can cause serious injury.
Step 2:
BRIDGE ADJUSTMENT
In order for the shear to cut properly, there can be no play in any of the pivot or slider mechanism components. Play will allow the upper blade to move away from the lower blade during shearing resulting in a poor cut.
The steel bars at either end of the bridge should be adjusted first. Since the one at the pivot end of the bridge does not move, it should be tightened securely to the leg by means of the large bolt. Care must be used in adjusting the bar at the slider end however, as it must be able to pivot forward and backward. Proper adjustment can be achieved by tightening the large bolt and nut on the leg as tight as possible while still allowing the bar to rock freely back and forth as the handle is raised and lowered.
The next step is to adjust the gibs. Slightly loosen all four screws and then wiggle the bridge and observe the play between the gib and the bar. (Note: it is a good idea to remove each screw individually and apply a thread-locking compound. This will prevent the screws from loosening during operation.)
Starting at the pivot end, use a 1/8” hex key and tighten one screw until it contacts the gib and pushes it snugly against the bar. Then do the same to the other. Next, check to see that there is no play by wiggling the bridge again. If there is no apparent movement, raise and lower the shear handle to make sure it operates freely. Duplicate the procedure on the front gib.
When adjusted properly, the pressure between the gib and bar should be such that the shear can be opened and closed without any sideways play. If the shear closes by itself when the handle is released, the tension is too slight. Conversely, if the shear is difficult to operate, the tension is too tight. A good way to fine-tune the shear is to adjust the screws while opening and closing the shear.
After the adjustments are complete, lubricate the moving parts of the assembly by applying a silicone spray to both sides of the pivot and slider bars and the three pivot pins.
Step 3:
BLADE INSTALLATION
Begin with the lower blade. Remove any dirt and material chips from the recessed part of the bed so the blade will sit flat. Turn the two adjusting washers so that the thinnest part is adjacent to the recess and lay the blade in place. Install the four flat head screws with their washers and nuts, but do not tighten. Then slide the blade as far back as possible.
Next attach the upper blade with the four cap screws making sure the heads of the screws go against the blade. Before proceeding, make sure the angle on the cutting edge faces away from the bed. Since the mounting holes in the blade are uniformly spaced, it is possible to install the blade backward.
The easiest way to attach the upper blade is to put a screw in each end of the blade and then carefully lift it into place. Install the washers and nuts and then install the remaining screws. Since the upper blade requires no adjustment, the screws can be tightened securely at this time.
Step 4:
BLADE ALIGNMENT
Proper blade alignment is accomplished by adjusting the lower blade so there is proper clearance between it and the upper blade. While this is not a difficult procedure, care is required to get it perfect. Too much clearance between the blades allows the material to be pushed between the blades and results in poor cuts. Too little clearance causes the blades to contact each other and cause premature dulling of the blades.
Close the shear while making sure the lower blade is back far enough that the blades don’t hit. Next, slide the blade forward so that it lightly touches the upper blade along the entire length. Rotate the eccentric washers so they contact the back of the blade and snug the screws. Tighten the blade mounting screws. At this point, slowly open and close the shear. If the blades touch and make a grating sound, they are too close. In this case, go back and slightly readjust the position of the lower blade.
A more precise method of setting the clearance can be accomplished with the use of a feeler gauge or a piece of shim stock that is .001” thick. Place the shim or gauge piece between the blades and proceed as above.
When properly adjusted, it should be possible to cut a piece of paper along the entire length of the shear without the blades grating together. If the paper gets pushed between the blades when you try to cut it, they are too far apart. This process usually requires some trial and effort, but when it is done correctly, it will yield clean, accurate cuts and extended blade life. When the final adjustment is complete, carefully tighten the blade mounting screws and the eccentric washers.
Note: As a rule-of-thumb, lower blades need to be replaced when they have been resharpened to the point where the eccentric washer will not contact the back of the blade. Upper blades should be replaced when they do not extend past the bottom of the lower blade when the shear is closed.
Step 5:
SQUARING
Other than the quality of the cut, the most important aspect of shear set-up is squareness. This is easily set by adjusting the scale at the top of the shear. Squaring should be the final adjustment in the set-up process since other adjustments can change the position of the upper blade and, hence, the squareness.
The best method is to use a carpenter’s square. Typically, the arms of these squares are too long to fit against the 12” dimension of the upper blade, so one arm must be cut to approximately 12”. While it is possible to use a smaller square, the most accurate set-up results are achieved when the square runs the entire length of both the upper blade and the scale.
With the shear closed, position one arm of the square so it contacts the entire length of the upper blade. Next loosen the two screws holding the scale and, making sure the square is against the blade, position the scale so it contacts the top edge of the square along its entire length. Check to make sure the end of the scale just touches the upper blade and then tighten the screws. Recheck that the guide is still aligned properly, as tightening the screws can cause the guide to move slightly.
The final adjustment, if required, involves setting the shearing angle. This is the angle at which the upper blade contacts the material as it makes the cut. If, assuming the blades are sharp and the shear is properly adjusted, the amount of force required seems too great and the material has a tendency to pull, the angle is too flat. This can be corrected by loosening the bolt (12) holding the pivot bar and lowering the end of the bridge. It is best to make small adjustments and test cuts until a good cut is achieved with the minimum amount of force. Use a twelve-inch piece of material for the test cuts to test the full length of the shear cut.
If the shearing angle is set correctly and the upper blades (particularly the metal cutting one) are resharpened properly, this adjustment usually does not have to be made on a routine basis. It should, however, be checked any time a new upper blade is installed.
The last step is to replace the guard and make a final test. If adjusted properly, your “new” shear should produce plates with clean edges and perfectly square corners.
|